
DIY Wednesday: Out of the Box Picture Hanger
- Oct 28, 2015
- 3 min read

For this project, we are literally thinking right out of the box. We basically are taking some cardboard and creating a new and creative way to hang pictures in your room. I found this idea on Pinterest (credit given to http://www.usefuldiy.com) and simply added it to my crafting board to try at a later time. I figured it would be such a great idea to try making this at one point or another. I LOVE pictures so much! And last year I put pictures up all over my wall, but I used tape. Well, let’s just say that at the end of the year when it was time to move out of the residence hall, I had one heck of a time taking those photos down. It was so time consuming and greatly frustrated me. So I really couldn’t blame myself when I found that I had no motivation to hang all of those photos and then some new ones back up on my wall. This past weekend gave me some free time so I decided to try out this idea using some clothespin and cardboard.

This project requires only a few items: cardboard, clothespins, hot glue, pen/pencil, and a box cutter.
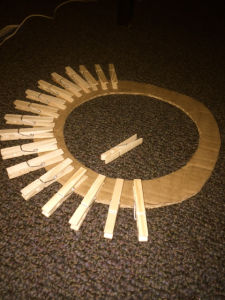
I began by cutting out a circle from one of the flattest edges of the cardboard box. I followed up with cutting out a circle in the middle, leaving a cardboard box circle about 1 1/2 – 2 inches wide. A friend suggested easier ways to make these circles. To make the smaller circle, I used construction paper, folded it in half, and cut out a circle. I traced that on the cardboard. I then grabbed some thread, tied one end to the pen, and held the other down in the middle of the already traced circle. I then would trace a circle on the outside, keeping the thread tight to create a smooth line.

My next step: cut the circle out. I borrowed a friend’s box cutters and he provided supervision because apparently no one trusts me not to accidentally cut off one or two of my fingers.
Once the circle is all cut out, there is only the glueing of the clothespins onto the circle. I got a pretty nice pack from the Doller Store (a dolla make a college kid holla!), and plugged in my hot glue gun.

The worst part? Waiting for the glue to heat up. I’m the most impatient person ever, and could not wait to see the finished product!
Make sure when glueing, to glue the pin so that the open clip part is facing away from the circle, otherwise, how else will you hold the pictures? I glued the pins on the cardboard, leaving about 1/2 inch facing the middle of the circle.
Halfway there!

All done! This project did not take much time, an hour at the most. But most of that time was spent trying to make a perfect enough circle.
To hang it up on my wall, I just used a smaller command hook. I put it over my bed, because I felt that I needed something to take up the wall space, I’ve been trying to figure out ways to decorate some of my bare walls. I clipped on some of my favorite pictures and admired my job well done. This was a fun little project to do after a long day of work and class; these things are great de-stressors. Like I mentioned earlier, it did not take long at all, and I am really glad that it works out conveniently, now I can admire my photos without having to deal with the hassle of hanging them up, and then tearing them down at the end of the year.

Already, I have gotten quite a few compliments from my friends and residents, so proud!

Looking for more ways to take up my bare walls, may have found another idea to accompany this decoration. Keep an eye out for a future post!
Until next time guys, keep calm and pin on! xoxo


Comments